VPN Server on a Raspberry PI 3
 WHY?
WHY?
I want to be able to connect to my home network from anywhere. There are two ways to do this, the first is to open up ports on my firewall, and route them through to the various programs that I want to be able to access from the outside world. This approach has implications, firstly it means that anyone could attempt to connect to those services that I want to access. This means that someone could hack into my network. This isn’t a nice thought.
A vpn allows me to encrypt the data sent from my devices. So this means that I can use other peoples networks without having to think about people that could want to snoop.
Lastly, using a VPN I could connect to my home network from anywhere in the world, then using my VPN I could use internet services as though I’m at home – this is because any data seen on the internet would be seen to be coming from my home network. So, if there is something that I can access from only my home IP Address, I can still access it even though I’m somewhere else. This makes a great security feature as I can have hosted services a website and have the admin access locked down to only my home IP address. Of course if my home IP address changes there could be a problem but that’s not something that happens often, so it’s better than leaving it open to the whole world to try and access.
Why a Raspberry PI 3?
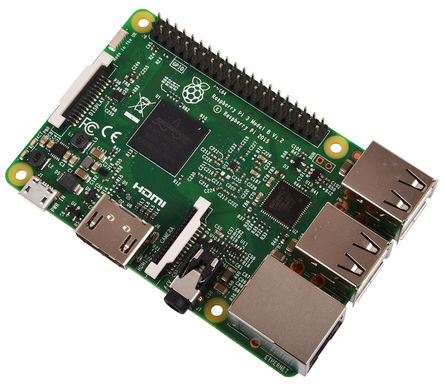 The Raspberry Pi 3 is the latest version of this great little device. It’s small, and doesn’t need a fan, so it’s silent. The tech specs are looking good as well. It’s got a 1.2Ghz Quad Core processor. Pulls less than 1A power, although they recommend a 2.5Amp power supply for this version. The device boots up fast, and the Pi uses a Micro SD card as a hard drive.
It runs the Linux operating system which is free, and has been used in servers worldwide for years. Overall this is a fantastic piece of hardware. The network power is only 10/100 Mbps, which with today’s fast internet could be a problem, however having a vpn server that is capable of delivering 50Mpbs (1/2 the 100Mbps) is more than enough for most applications, if you need more throughput maybe should should be thinking about a more expensive solution to the problem. For my needs, to be able to securely access my home network, copy files. Make remote desktop connections and access me home network devices, this device suits my needs.
Isn’t a VPN complicated?
Yep, it’s a complicated thing to setup and use, however that the purpose of this post. To make it relatively straight forward. There will be lots of steps to follow and it’ll take a few hours. This has be posted about before, actually I’m using a post on this very topic from the BBC as the basis of my post. Only since they did it things have been altered a bit which has caused the source post to be incorrect now.
Let’s get started
Setting up the Raspberry Pi 3
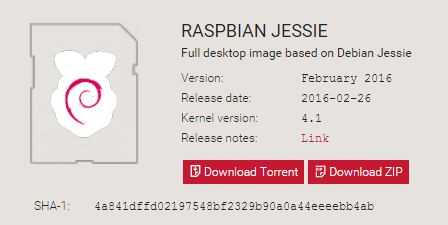 Let’s start this post from the very beginning. First step is to download Rasbian Jessie from here. I downloaded the full version as pictured here. Choose Download Zip to get the zip file version, next extract the zip file and you’ll get a single file 2016-02-26-raspbian-jessie.img. Keep this for a in a little while.
The next thing that you need to get is a program called Win32 Disk Imager. You can download it from here. Once downloaded run the setup program. Once completed launch Win32DiskImager.
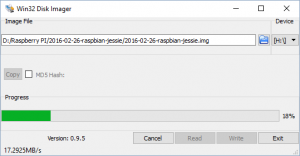 Put the Micro SD card that you are going to use for the Pi, into a memory card reader and insert that into your computer. Using the Win32 Disk imager, click the blue folder icon and use the dialog to find and select the 2016-02-26-raspbian-jessie.img that you extracted from the zip file earlier. Make sure that the Device box shows the drive letter for your Micro SD card. When you are ready, press the Write button. This will erase any data on that drive, so make sure that you choose the correct drive. This will take a few minutes to complete.
Once done, eject the Micro SD from your computer and plug it into the Rasberry Pi 3. Connect up the Pi and power up. Make sure to have both a mouse and keyboard installed on the Pi as it will now boot directly into the GUI rather than the command line.
Shutting off the GUI
 Rasbian Jessie now boots directly to a graphic desktop. As the point of this post is to turn the Pi into a server, this is a complete waste of processing power, that could be put to better uses. (like making the VPN run faster)
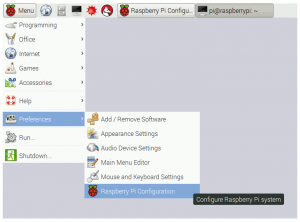
Using the mouse in the new GUI, click Menu –> Preferences –> Raspberry PI configuration
The fourth item down is Boot, change this to CLI. (It means command line interface) and choose OK. I want to get us to the command line as quickly as possible. This will make it easier for me to include screen shots.
SSH Terminal is the future
 So, we’re at the big black scary console window for geeks, here’s the best part. It only looks scary. If you follow these steps through, you’ll have a working VPN server, and if you show this post to your friends, they’ll look at all the big black command like stuff and think that you are a super geek, so be proud and rock it. let’s dive in, first thing that you’ll need is the IP address if your Pi, to get this type
ifconfig
now press enter (I’m not going to keep telling you to do that. at the end of each command you have to do it to make the command happen)
look through the text that came up and let’s find that IP Address. when you are looking for is the block that starts “eth0” the second line of that block will have an piece of text that reads inet addr: followed by a four part number, something like 192.168.0.47.
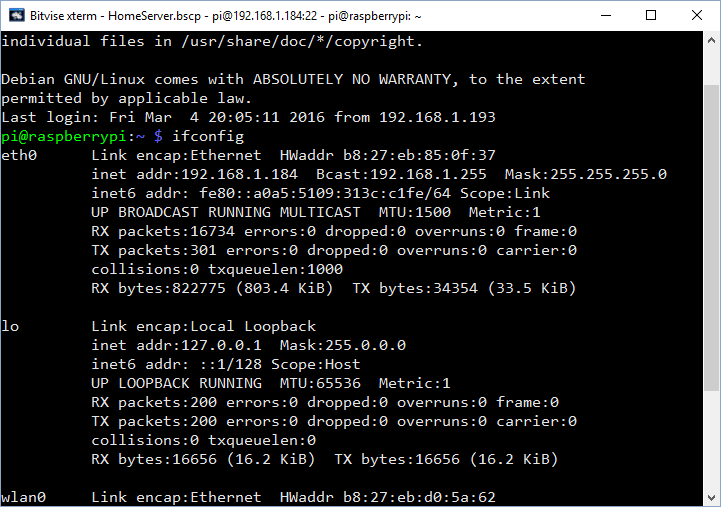 This screenshot shows the result of my ifconfig. In my case the ipaddress that I’m after is 192.168.1.184. Armed with this piece of information, we’ll get a program called and SSH Client up and running, this program will let your access the command line of your Pi from your computer. The SSH Client that I’m using is called bitvise you can download it from here.
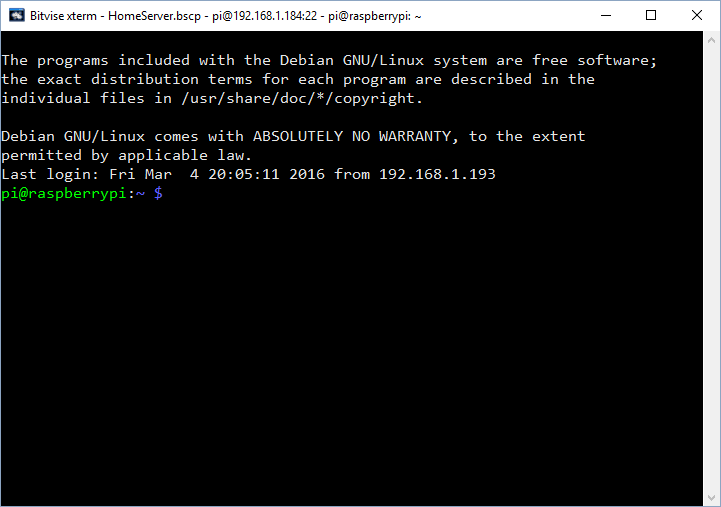
Install it and when you start up you’ll get a screen that looks like this.
 You’ll notice that I’ve type the IP Address of 192.168.1.184 into the Host box. In the Authentication enter pi as the username and “raspberry” as the password. Then click login. If you have done it right, you’ll get the console window appear on your screen. At this point you can unplug the monitor, keyboard and mouse. From this point on we can do everything through the console window.
Doing this will make things extremely easy, as you can even copy/paste the command from this post straight into the console window which will reduce the chance of spelling mistakes.
Finishing the PI setup.
So apart from turning off the GUI desktop, we still have our Raspberry PI in the factory configuration, this isn’t good for a VPN server, so let’s sort that out right now and I’ll talk you through the changes and why.
Execute the following command
sudo raspi-config
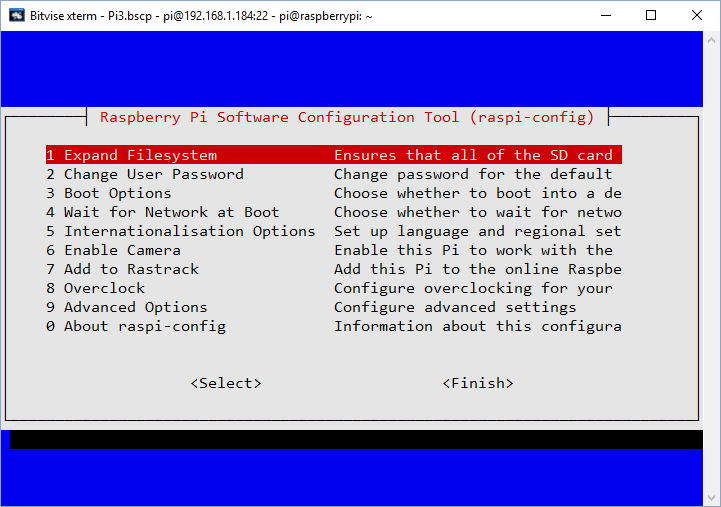
sudo is a command that means “Please run the next command in god mode”, sudo litererally means “superuser do”, raspi-config is a program that will let you configure the Rasberry Pi. This is the console version of the program that you ran on the desktop to get to the command line.
For those that have never run a console application before, the red line is the selected item. Press enter and you’ll run the Expand Filesystem command, you can do that now, so that your Mirco SD card will fully available from the next reboot. (We’ll reboot later), press enter after the expansion has finished and you’ll come back to the menu. Use the up and down arrow keys to navigate.
Let’s change the user password. So press the down arrow (the red bar moves to option 2) followed by enter. Use a secure password, remember your PI will be accessible from the internet so make it a hard to guess password, I chose a random set of letters and numbers. Something like 24kj234kbvkjf21 (No, mine isn’t that) It’s hard to guess, so should be very safe should someone manage to get to a password prompt. (which with the setup that I have they can’t do anyway, you’ll see the details of that bit later)
If you are following this setup guide with a Raspberry Pi 2 or older, you might want to choose the Overclock function and turn up the Speed of your PI, VPN’s do lots of encryption and decryption, so having the settings turned up will help – just don’t let the chip over heat and make sure you have enough power. For the Raspberry Pi 3 users, you can’t overclock, but that’s OK, as we have a 1.2Ghz process which is faster than an overclocked Pi or Pi2. (time for a smug look)
Next lets choose “9 Advanced Options”
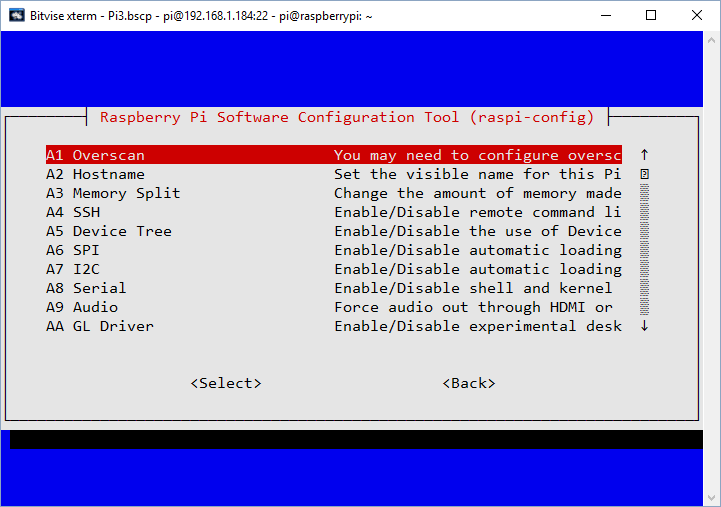 Choose “A2 Hostname”. You’ll get some instructions about what is allowed. I’m choosing this so that I can name my Raspberry Pi as “vpnserver”. This is the name that it will appear as on my network. If you don’t do this, your will be called “raspberrypi”.
You can choose any name that you wish, just be aware that only one device on your network can have that hostname.
You’ll notice that you were taken back to the first menu, so go back into the advanced menu and choose “A3 Memory split” by default the PI assigns 64MB of it’s 1024MG Ram to the graphics processor. So a value of 0 really means use 64MB. In future they may increase this further so to allow that the config value is set to 0, with really means “do what you like”, and is translated on boot to 64MB. This is done so that the nice looking GUI that you saw on first boot can work, look nice, perform well and play games. This is great for a media center, or a games machine, but for a VPN server we don’t need that.
The lowest option is 16MB, so enter
16
and we’ll have more RAM available for the CPU and keeping the PI running for a long time.
Great, we’re done with these settings. Press tab twice and the word “<Finish>” should turn red. You’ll be asked if you would like to reboot now. Press Tab and “No” will turn red, now press enter. (We’ll reboot later, for now, it’s OK as is)
Static IP address
By default your raspberry PI is configured ask for an IP address from a DHCP server. Most home networks have a router that provides this service. For a VPN server, we need to make sure that the IP Address remains the same, so rather than using a DHCP server, we will tell the PI what IP Address to use.
Your DHCP server will have a range of IP Addresses that is can auto assign, this is called the Dynamic range. It is best to assign a static IP Address outside this dynamic range. you should be able to find out your dynamic range from your router settings. As there are many different routers out there, and they all have different configuration screens, I’ll not go into the details of that here. Instead, I’ll make a guess, that your dynamic range will be somthing like 192.168.1.100 through to 192.168.1.200. So if we assign a static IP Address of 192.168.1.10 we’ll most likely be fine. And if that clashes with another device. I’m hoping that you know enough about your network to be able to choose a compatible IP Address. (yes, I’m wimping out of this bit, might do another blog post later on this topic for DLink routers)
Let’s get that static IP Address assigned, enter this command
sudo nano /etc/dhcpcd.conf
use the arrow keys to scroll to the bottom of the file then add the following
# Custom static IP address for eth0.
interface eth0
static ip_address=192.168.1.10/24
static routers=192.168.1.1
static domain_name_servers=192.168.1.1
static domain_name=lan.cjdawson.com
static domain_search=lan.cjdawson.com
 The code about eth0 means the wired network port. 192.168.1.10 is the new static IP Address for the Raspberry Pi 3. you can change this number if you want a different IP Address. Router is the IP address of your router, It’s normally 192.168.1.1, and your router also has a domain name server as well, so again should be the same. If your network is different feel free to switch out the information.
Now press and hold Ctrl and press the X key (This is normally written as Ctrl-X) then press Y to save the changes. Next press enter, and you’ll be returned to the command prompt.
Now we’re going to reboot your PI. To do that enter
sudo reboot
At this point, you’ll need to change BitVise over to use the new IP Address
If you’ve followed everything correctly you should now be able to open a new console window on the new IP Address.
So what happened to the VPN Server?
Bet you were beginning to think I’d forgotten about that. Just one more thing to do and we’ll be ready to begin. Enter these two commands
sudo apt-get -y update
sudo apt-get -y upgrade
So what does this mean? apt-get is a program for installing applications, it’s a bit like google play, but it doesn’t cost anything. However you do have to configure things after installing them. Which is the point of this blog post. the -y parameter means “yes”
These two command make sure that you are running the very latest version of Rasbian Jessie and that any software patches are applied. A bit like windows update.
OpenVPN here we come
 Next let’s get the VPN software installed. We’ll need two commands.
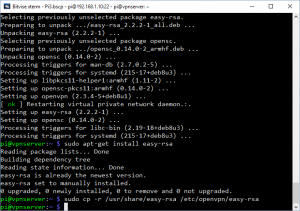
sudo apt-get -y install openvpn
sudo apt-get -y install easy-rsa
OpenVPN is the name of the VPN Software. This is the equivilant of running an installer in windows, but it also downloads the program from the internet as it does it. easy-rsa is going to help us configure OpenVPN.
Sudo -s
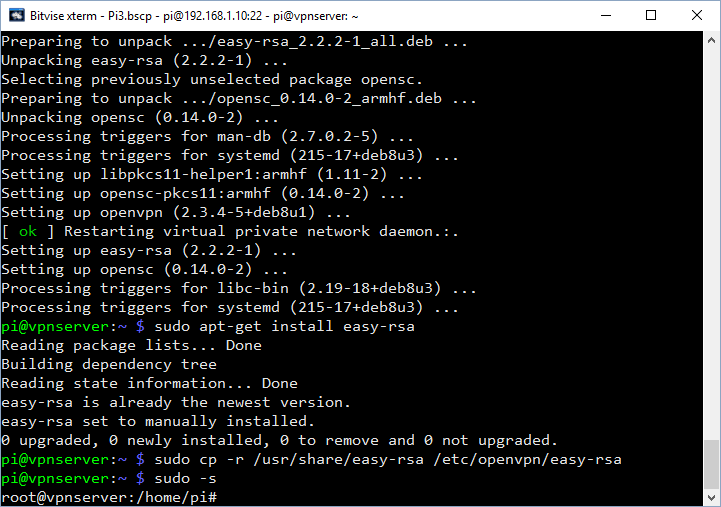 Time to become a deity, at least in linux terms. Up to now you have been typing sudo in front of every command, this is ok, but it’ll get very tiresome very quickly, especially with what I we will be doing, so enter this.
sudo -s
Now you don’t have to type sudo before the commands, it’s already done for you, just be careful as you are now able to do stupid things like destroy the operating system if you enter the wrong command (don’t worry, there’s no commands like that in this post, just wanted you to know the power that sudo lets you have)
Once you entered the command notice how the command prompt changes. This lets you know that you are now running in super user mode, you are now running as “root” instead of “pi”. Root is the linux way of saying that you are all powerful.
Back to the VPN setup
Next command
cp -r /usr/share/easy-rsa /etc/openvpn/easy-rsa
This copies the content of the /usr/share/easy-rsa folder to /etc/openvpn/easy-rsa. The second folder is where the OpenVPN software will be getting the configuration information from. So this saves us from setting everything up manually.
Next command
cd /etc/openvpn/easy-rsa
cd means change directory, and we are switching into the directory where we copied the easy-rsa files earlier.
now we are going to start editing the stuff that we copied over to make it suitable
nano /etc/openvpn/easy-rsa/vars
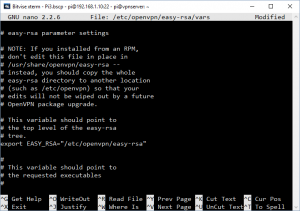 nano is a text editor we’re going to edit a file called vars
In the text that opens find the line that begins: export EASY_RSA=
You need to move the cursor down to edit this line to read
export EASY_RSA="/etc/openvpn/easy-rsa"
see the image on the left to see what how it needs to look.
Next move your cursor down until you see the line.
This next step is optional, I skipped this as I want more security, it’s here in case you want to do it.
Scroll down until you find a line that reads
export KEY_SIZE=2048
If you want to speed up the install, but at the cost of security, change this number to 1024. Doing this will mean that you can save yourself an about an hour of install time, but at the cost of your VPN being less secure.
I personally chose to keep this at 2048 as once that step that takes an hour as done you will have a more secure connection.
Back to the task at hand
Keep scrolling to the end of the file and you will see a bunch of export parameters such as Country, Province and City etc. You can choose to change these to set new defaults (this will potentially save you some typing in various later stages), but doing so will not affect the workings of your VPN.
Save the file and exit from Nano. Press Ctrl+X then Y and enter.
Building the certificates
With Raspbian Stretch things changed a little so here’s a new command.
ln -s openssl-1.0.0.cnf openssl.cnf
These commands will build the certificates that will be used with authenticating.
source ./vars
 ./clean-all
 ./build-ca
The first command loads the file that you just edited. ./clean-all will remove any keys that are present, this could cause problems later, so it’s best to check and be sure. ./build-ca builds a certificate authority. This means that you are able to issue certificates. This is the same as certificated issues by Verisign, however, because it wasn’t issued by someone who is “trusted” you can’t really use them to protect websites in the same way. This doesn’t matter as you are making a certificate authority for yourself, you do trust yourself, right? 😉
The Pi will now ask you to complete some additional values, like Country, Province, City, Organisation etc. (if you changed these in the previous stage you will see your own choices already set as default). Hopefully you set them earlier, so you should be able to simply press enter for each of these to use the value that is in the brackets.
Name the key server
./build-key-server [ServerName]
replacing [ServerName] with your choice of name. I’m naming my key server cjdawson.com
So I will actually be typing
./build-key-server cjdawson.com

make a note of your ServerName as you will need it later on
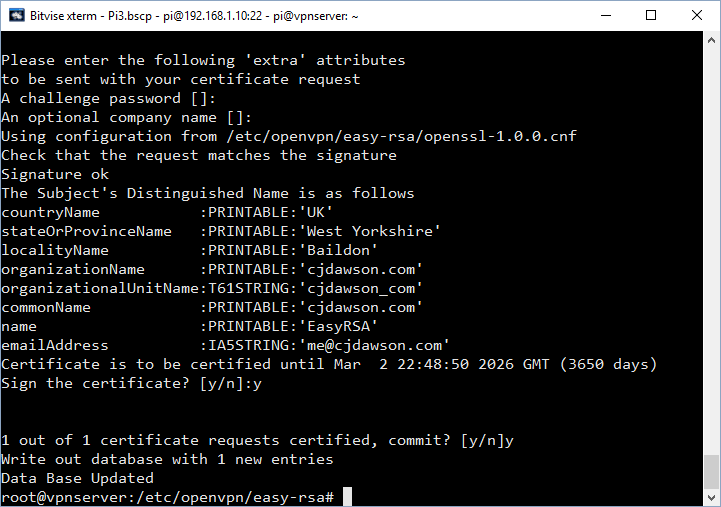 You will now be given some more fields to enter values. You can change these or leave them as the defaults, but pay attention to three fields
Common Name MUST be the server name you picked.
A challenge password? MUST be left blank.
Sign the certificate? [y/n] Obviously, you must type “y.”
Finally when prompted with the question:
1 out of 1 certificate requests certified, commit? [y/n]
Type “y”
Build keys for each user
Your server is now set up and you need to build keys for all the devices you want to be able to connect.
You can cut corners here and just build one key to use on all devices. Only one device can connect using each key at a time though, so if you want simultaneous connections you will need a different key for each one.
As I have an iPhone, iPad, Android Tablet, MacBook Pro, Windows laptop amongst other kit I will be making a seperate key for each device, plus I’ll be making keys so that I can access from work, and one so for general purpose use. This way, I can connect several devices at the same time, also if one of the keys is left somewhere, it will be easy enough to change the lock without having to reset everything.
To make a key type
./build-key-pass [UserName]
Don’t forget to replace [UserName] with the name that you want for your key.
For example I’m going to be typing
./build-key-pass ColiniPhone
./build-key-pass ColiniPad
And so on.
Enter PEM pass phrase
… choose a password you will remember! It asks you to input this twice to eliminate errors.
A challenge password? MUST be left blank.
Sign the certificate? [y/n]
Hit “y”
type
cd keys
Then for each key that you created you type
openssl rsa -in [Username].key -des3 -out [UserName].3des.key
so I’ll be typing
openssl rsa -in ColiniPhone.key -des3 -out ColiniPhone.3des.key
openssl rsa -in ColiniPad.key -des3 -out ColiniPad.3des.key
You will then be asked to enter and repeat a new PEM pass phrase for the des3 key. I used the same pass phrase for both so you only have one to remember. You will need the 3des.key pass phrase at the end of this process when you import your files to your devices.
Repeat these steps for all the usernames you want to build a key for.
You have now created your “client certificates”. Type:
cd ..
Generate the Diffie-Hellman key exchange.
 This is the code that lets two entities with no prior knowledge of one another share secret keys over a public server. Type:
./build-dh
The screen will slowly fill with dots as the key is built from random numbers. This should take just over an hour, unless you did the step to lower the 2048 number to 1024 earlier in which case, it’ll take about 5 minutes.
Denial of Service (DoS) attack protection
OpenVPN protects against this kind of attack by generating a static pre-shared hash-based message authentication code (HMAC) key. This means the server will not try to authenticate an access request if it does not detect this key. To generate the static HMAC key type:
openvpn --genkey --secret keys/ta.key
If you are using copy and paste it probably will not work on this line as the double “-” seems not to translate in the same way if you do not type it in.
Configuring your server
Now you have created all the locks and keys you need to tell your Raspberry Pi where you want to put the doors and who you want to give the keys to – essentially instructing the OpenVPN which keys to use, where you are going to be connecting from and which IP address and port to use.
To do this you must create a server configuration file. At command prompt type
nano /etc/openvpn/server.conf
This opens an empty file.
Fill it with this text, taking care to change the details where indicated with a comment in # CAPS LOCK. (Placing a “#” in front of a sentence in the code like this tells the system it is a comment and to ignore it when building the program). Also when changing the YOUR SERVER NAME sections I refer to the server name that was given to the ‘build-key-server’ command earlier on
dev tun
proto udp
port 1194
ca /etc/openvpn/easy-rsa/keys/ca.crt
cert /etc/openvpn/easy-rsa/keys/XX.crt # SWAP XX WITH YOUR SERVER NAME
key /etc/openvpn/easy-rsa/keys/XX.key # SWAP XX WITH YOUR SERVER NAME
dh /etc/openvpn/easy-rsa/keys/dh2048.pem # IF YOU CHANGED YOUR ENCRYPTION TO 1024, CHANGE THAT HERE
server 10.8.0.0 255.255.255.0
# server and remote endpoints
ifconfig 10.8.0.1 10.8.0.2
# Add route to Client routing table for the OpenVPN Server
push "route 10.8.0.1 255.255.255.255"
# Add route to Client routing table for the OpenVPN Subnet
push "route 10.8.0.0 255.255.255.0"
# your local subnet
push "route 192.168.1.10 255.255.255.0" # SWAP THE IP NUMBER WITH YOUR RASPBERRY PI IP ADDRESS
# Set primary domain name server address to the SOHO Router
# If your router does not do DNS, you can use Google DNS 8.8.8.8
push "dhcp-option DNS 192.168.1.1" # THIS SHOULD ALREADY MATCH YOUR OWN ROUTER ADDRESS AND SHOULD NOT NEED TO BE CHANGED
# Override the Client default gateway by using 0.0.0.0/1 and
# 128.0.0.0/1 rather than 0.0.0.0/0. This has the benefit of
# overriding but not wiping out the original default gateway.
push "redirect-gateway def1"
client-to-client
duplicate-cn
keepalive 10 120
tls-auth /etc/openvpn/easy-rsa/keys/ta.key 0
cipher AES-128-CBC
comp-lzo
user nobody
group nogroup
persist-key
persist-tun
status /var/log/openvpn-status.log 20
log /var/log/openvpn.log
verb 1
hit Ctrl+X then y and enter to save.
There is one last edit to make in the server configuration files to make sure your Raspberry Pi knows you want it to forward Internet traffic through our new network.
Type:
nano /etc/sysctl.conf
Near the top it says, “Uncomment the next line to enable packet forwarding for IPv4.”
You want to remove the “#” from the start of the next line to inform OpenVPN you want it to take that text into consideration.
The line should then read:
net.ipv4.ip_forward=1
Hit CTRL-X, then Y and ENTER to save.
Finally you need to action the change you just made in the sysctl.conf file. To do this type:
sysctl -p
You have now made a functioning server that can access the internet.
Create profile scripts for the devices you want to connect
We have created keys for clients (computers and devices) to use to connect to your VPN, but we have not told the clients where to find the server, how to connect, or which key to use.
If you created several different client keys for each of the devices you want to grant access, it would be a lot of trouble to generate a new configuration file for each client from scratch.
Luckily Eric Jodoin of the SANS institute has written a script to generate them automatically.
First type:
nano /etc/openvpn/easy-rsa/keys/Default.txt
Fill in the blank text file with the following
client
dev tun
proto udp
remote [YOUR PUBLIC IP ADDRESS] 1194 #REPLACE YOUR DYNAMIC DNS VALUE FROM CHANGEIP.COM
resolv-retry infinite
nobind
persist-key
persist-tun
mute-replay-warnings
ns-cert-type server
key-direction 1
cipher AES-128-CBC
comp-lzo
verb 1
mute 20
In the above I replaced [YOUR PUBLIC IP ADDRESS] with the domain name of my Dynamic DNS which is a feature of my dLink router.
Next, to create the script that makes your profile keys type:
nano /etc/openvpn/easy-rsa/keys/MakeOVPN.sh
In this file you need to add the text that Jodoin wrote to create the script:
#!/bin/bash
# Default Variable Declarations
DEFAULT="Default.txt"
FILEEXT=".ovpn"
CRT=".crt"
KEY=".3des.key"
CA="ca.crt"
TA="ta.key"
#Ask for a Client name
echo "Please enter an existing Client Name:"
read NAME
#1st Verify that client's Public Key Exists
if [ ! -f $NAME$CRT ]; then
echo "[ERROR]: Client Public Key Certificate not found: $NAME$CRT"
exit
fi
echo "Client's cert found: $NAME$CR"
#Then, verify that there is a private key for that client
if [ ! -f $NAME$KEY ]; then
echo "[ERROR]: Client 3des Private Key not found: $NAME$KEY"
exit
fi
echo "Client's Private Key found: $NAME$KEY"
#Confirm the CA public key exists
if [ ! -f $CA ]; then
echo "[ERROR]: CA Public Key not found: $CA"
exit
fi
echo "CA public Key found: $CA"
#Confirm the tls-auth ta key file exists
if [ ! -f $TA ]; then
echo "[ERROR]: tls-auth Key not found: $TA"
exit
fi
echo "tls-auth Private Key found: $TA"
#Ready to make a new .opvn file - Start by populating with the default file
cat $DEFAULT > $NAME$FILEEXT
#Now, append the CA Public Cert
echo "<ca>" >> $NAME$FILEEXT
cat $CA >> $NAME$FILEEXT
echo "</ca>" >> $NAME$FILEEXT
#Next append the client Public Cert
echo "<cert>" >> $NAME$FILEEXT
cat $NAME$CRT | sed -ne '/-BEGIN CERTIFICATE-/,/-END CERTIFICATE-/p' >> $NAME$FILEEXT
echo "</cert>" >> $NAME$FILEEXT
#Then, append the client Private Key
echo "<key>" >> $NAME$FILEEXT
cat $NAME$KEY >> $NAME$FILEEXT
echo "</key>" >> $NAME$FILEEXT
#Finally, append the TA Private Key
echo "<tls-auth>" >> $NAME$FILEEXT
cat $TA >> $NAME$FILEEXT
echo "</tls-auth>" >> $NAME$FILEEXT
echo "Done! $NAME$FILEEXT Successfully Created."
#Script written by Eric Jodoin
\ No newline at end of file
CTRL and X then Y and ENTER to save.
N.B. I was not able to successfully copy and paste the entire script accurately in one go, but taking it one section at a time worked no problem).
Next you need to give this script permission to run. Type:
cd /etc/openvpn/easy-rsa/keys/
Then to give it root privileges type:
chmod 700 MakeOVPN.sh
Finally, execute the script with:
./MakeOVPN.sh
As it runs, it will ask you to input the usernames names of the clients for you generated keys for earlier (in my case ColiniPhone). Type that when prompted and you should see the line:
Done! ColiniPhone.ovpn Successfully Created.
Repeat this step for each additional username you added client.
Export your client keys for use on the connecting devices
Type
chmod 777 /etc/openvpn
chmod 777 /etc/openvpn/easy-rsa
chmod 777 /etc/openvpn/easy-rsa/keys
chmod 777 /etc/openvpn/easy-rsa/keys/*.ovpn
Now using bitvise you can press the “new SFTP window”
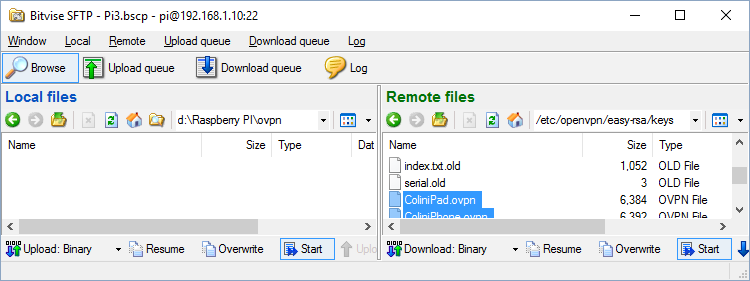 This window is split into two halfs, on the left is your computer. On that side navigate to a place where you can store the ovpn profiles. These will need to be distributed to the openclients (more on that later)
on the right side type
/etc/openvpn/easy-rsa/keys

into the address bar, the press enter.  Click on the type column to sort the files listed by type.  Scroll down to find the files ending in .ovpn, they'll be grouped together.  Select them and drag them to the window on the left.  This will copy the profiles from the Raspberry Pi to your computer.

now back in the Raspberry Pi console type.
Be sure to undo this when you’re done copying files by typing:
chmod 600 /etc/openvpn
chmod 600 /etc/openvpn/easy-rsa
chmod 600 /etc/openvpn/easy-rsa/keys
chmod 600 /etc/openvpn/easy-rsa/keys/*.ovpn
Making openvpn restart on reboot
As of right now, you have a fully fledged working vpn server. However there’s still a few things to do to make sure that you are use it. First job is to make OpenVPN start automatically when your Raspberry Pi starts up. To do that type
systemctl enable openvpn@server.service
Opening the internal firewall
If you attempted to connect to your VPN you would be able to do it however it won’t be able to do anything, so we need to override the firewall that’s already build into the ip.
nano /usr/local/bin/firewall.sh
Here is the content of the script.
#!/bin/bash
iptables -t filter -F
iptables -t nat -F
iptables -A FORWARD -m state –state RELATED,ESTABLISHED -j ACCEPT
iptables -A FORWARD -s “10.8.0.0/24” -j ACCEPT
iptables -A FORWARD -j REJECT
iptables -t nat -A POSTROUTING -s “10.8.0.0/24” -j MASQUERADE
Now Ctrl+X then Y and Enter. That saves the scripts, next you need to give it permission to execute
chmod +x /usr/local/bin/firewall.sh
We can run it now, so that you don’t have to reboot your Pi.
/usr/local/bin/firewall.sh
 And to see that it’s worked, execute this command.
iptables –list
to see that it’s working, look for the line that reads
ACCEPT all — 10.8.0.0/24 anywhere
What this means is that all traffic from ip address 10.8.0.0 (the unencrypted end of your vpn) can send network packets anywhere. Any device connected to your VPN will communicate with OpenVPN using encrypted data. OpenVPN then unencrypts that data and sends the packet on from ip address 10.8.0.0. This is a technology called Network Address Translation (or nat for short) and is how your router connects to the internet. We’re using the same thing to make the VPN possible.
 Now, let’s make that firewall stuff survive a reboot.
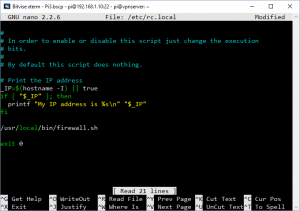
nano /etc/rc.local
Once the script is open, add the following before the line that reads “exit 0”
/usr/local/bin/firewall.sh
See the image on the left to see how the edited file should look.
Now Ctrl-X then Y and enter.
If you’ve got this far, you should have a fully working, funcational VPN that will work. Next job is to setup port forwarding on your router to forward udp port 1194 to your Raspberry Pi that should be on IP Address 192.168.1.10 (or the IP that you have been using all throughout this post)
Here’s a screenshot of the settings that I have done on my D-Link router.
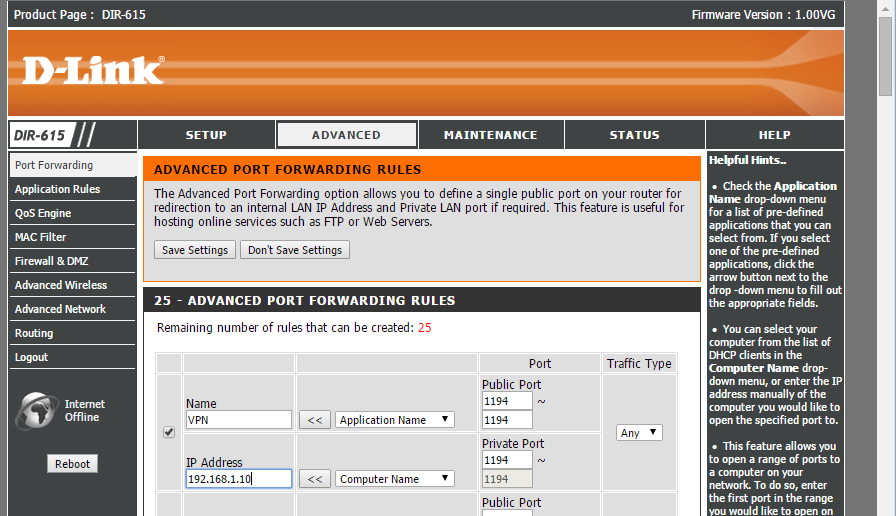
Save that change, and you should be done with all the configuration. Now let’s get it working.
Connecting to your new VPN
To connect to your VPN you are going to need to setup the OpenVPN client application on your device. As I have a several Apple devices, I can show you how to do it on those, for android the process should be extremely similar.
This is where you will be using those ovpn files that we copied off your PI earlier. They are the keys that let your devices access the VPN.
Setting up and iPhone/iPad
To setup and iPhone or iPad, you’ll first need to install the OpenVPN connect, which you can get for free from the Apple App Store.
Once that’s installed, you need to connect your iPhone or iPad to a computer. I’m sure there are other ways, but this is the most secure method that I know of. In iTunes select your iPhone/iPad then click on Apps in the left menu bar scroll the window down and you will see a file sharing section. Inside that file sharing section fine the OpenVPN program and click on it. To the right you will see a big panel that says OpenVPN Documents. Click on that and then click the “Add file…” button in the bottom right of the screen. Use this to find your ovpn file and click open. The screenshot below should help if you are struggling to follow that.

Now let’s head over to the iPhone itself. Open the OpenVPN app.
![]()
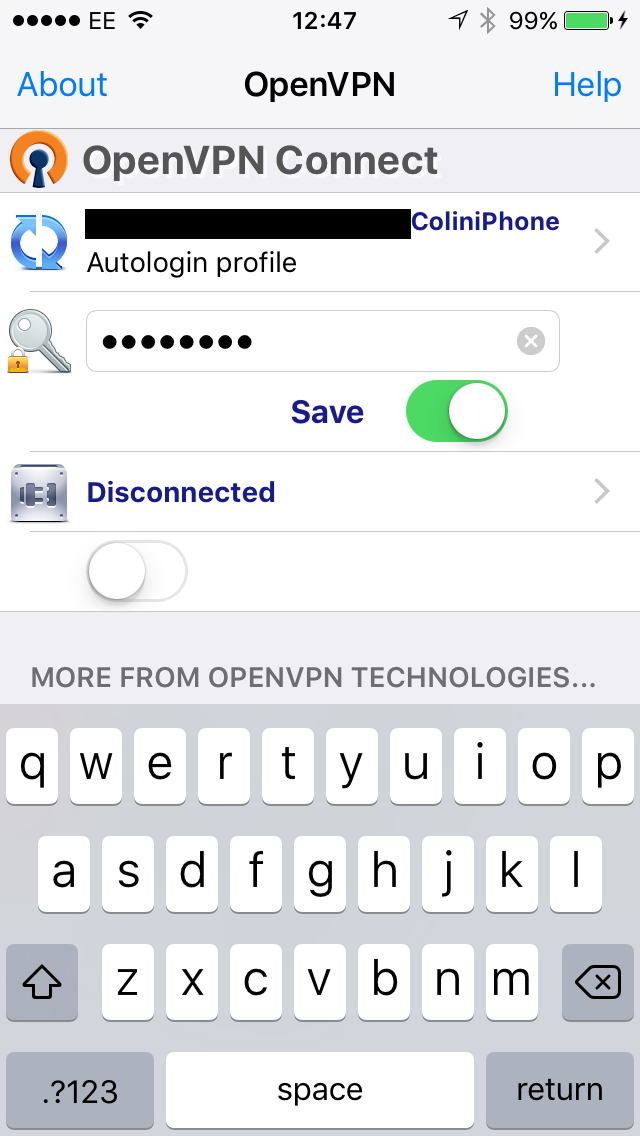
You will see the profile that you setup earlier when we were making the ovpn files. This means that you don’t need to type in your ipaddress or anything like that. The ovpn file already knows where to connect.
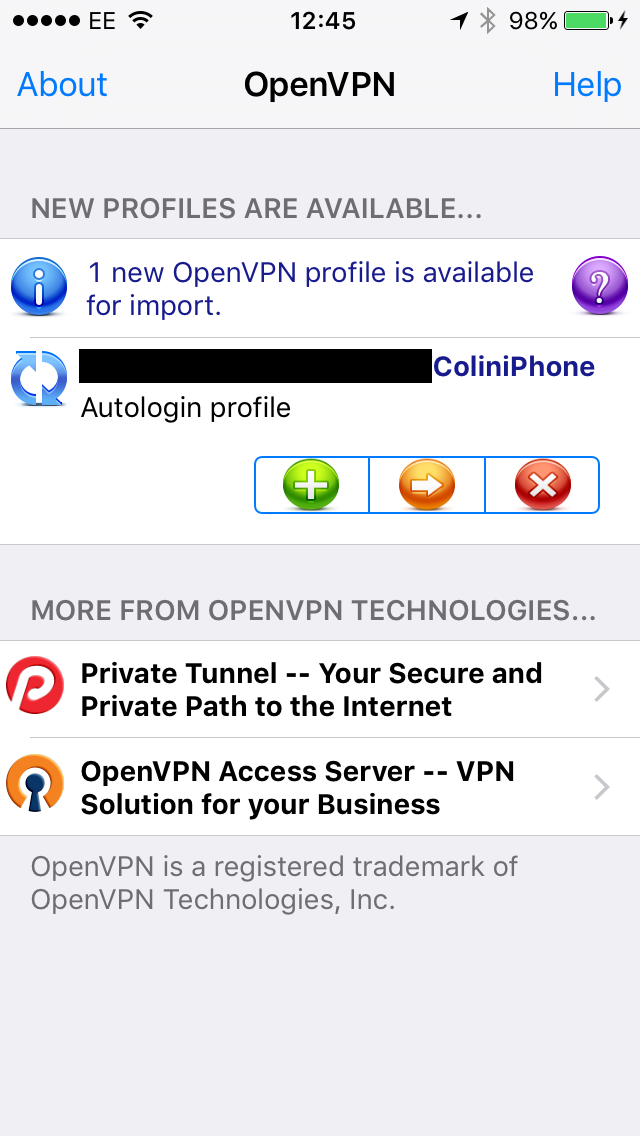
Press the Green + to import the profile.
Next type in your private key password. This is the PEM password that you entered earlier.
Now the moment of truth. Below the word disconnected is a slider, this is how you connect to your VPN. slide that to the right, and if it works you’ll see a screen similar to below.
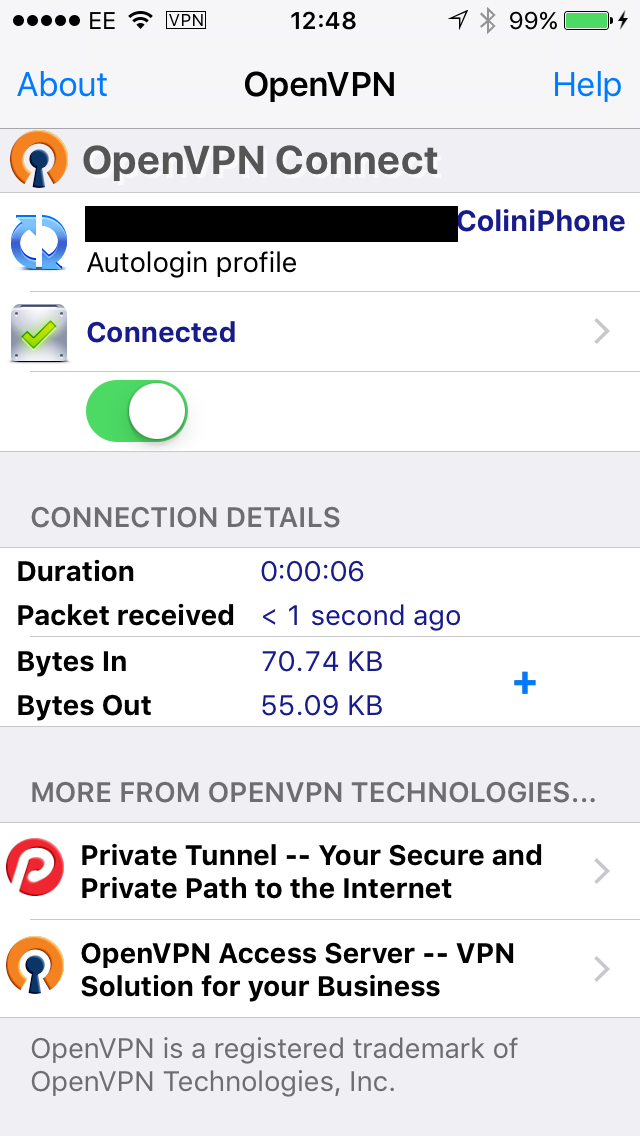
At this point you can now switch to your web browser, and see if you can browse the internet. If you can, everything is working just right. Your iPhone/iPad will now encrypt all your internet traffic and send it to your vpn server.
Thanks for the guide. So far so good but I was having issues with the firewall.sh part.
Ran the script and it gives this error:
Bad argument `–state’
Try `iptables -h’ or ‘iptables –help’ for more information.
iptables v1.4.21: invalid mask `24”’ specified
Try `iptables -h’ or ‘iptables –help’ for more information.
iptables v1.4.21: invalid mask `24”’ specified
Try `iptables -h’ or ‘iptables –help’ for more information.
Sorry – I accidentally clicked port comment.
However, so I changed -state to –state but its still giving me this error
iptables v1.4.21: invalid mask `24”’ specified
Any thing im doing wrong?
Thanks!
Nevermind – i figured it out. I just have to remove ” ” from
iptables -A FORWARD -s “10.8.0.0/24” -j ACCEPT
changed to
iptables -A FORWARD -s 10.8.0.0/24 -j ACCEPT
awesome guide! Thanks again
Glad to see that you got it working. I’ve updated the post with the correction (removed the ” marks from the IPAddresses) not sure why I didn’t have problems with it as I was copy/pasting when I made my VPN server.
you dont need to actually remove them, just delete the fancy utf8 slannted ones that look pretty in wordpress and replace them with propper vertical ASCII double quotes
Great guide ! Thanks for it. I had a lot of trouble installing openvpn on a raspberry pi 2 before finding it.
I had some little problems while copy pasting usr/local/bin/firewall.sh, didn’t work and I spent time figuring out what to change :
– I needed 2 “-” (hyphen) before state RELATED,ESTABLISHED
– Also the quotes (“) did not copy well.
(I am on windows/chrome and connecting to the pi via putty.)
I would suggest to give all the commands/scripts as unformated text files or in “code” blocks to avoid this kind of things, maybe it will help.
The problem of hyphens is a common one, I think it’s something to do with wordpress. I’ll take a look at trying to get all the commands in code block – might take me a little while to do as I’m in a rather crazy time at the moment (and loving it)
Nice Guide, I’ve noticed my Public IP is the same whether I am connected to Openvpn or not. Did I miss a step or is there something I can do to mask this?
I’d not looked at the public IP before. I just did a quick test with my iPad, using the openvpn client. Here’s the google query that I used, http://lmgtfy.com/?q=what%27s+my+ip
with my vpn off, I got the real public ip of my ipad (using only the 4g connection). Next I turned on connected to my Open VPN using, and refreshed the google link. The IP Address then changed to my home network. Finally, disconnecting the VPN and my public IP reset to normal. In my case it’s working great.
I do remember when I set up the VPN and was building the blog post, there was a setting that you could adjust on the server side that decided whether your device made all IP traffic via the VPN, or used the VPN as a service (I forget it’s official name). On the first configuration (and I’m sure this is what I blogged) all IP access is routed through the VPN, making it appear as if your computer is part of the network where the VPN Server is located, regardless of where you really are. The other mode, allowed you to access the devices on the VPN, but it didn’t route your network traffic through the VPN. This other mode is so that you can gain access to the network, but without masking where you are. This second mode is what I would expect a company to set up for their employee’s who connect in from home. It means that their internet browsing doesn’t go through the vpn, but stuff that’s directed to the company resources would go through it. I’m guessing that you’ve probably configured this setup for your server.
If I remember it correctly, the difference is something in the /openvpn/server.conf and in the .ovpn file that you use to connect. I can’t remember the details, but know it’s something to do with the PUSH commands.
Hey,
Got it working on a Pi2. Great guide.
Just wondering if there is an easy way I could toggle the server on and off from a python or shell script? What command could I used to turn the server off without rebooting? I just want an easy way to enable/disable it without messing with the router settings.
Thanks,
DON
Sounds like all you need to do is start or stop the Open VPN service. Can’t remember the command to do this offhand. I leave mine turned on all the time. It’s working like a charm.